#notes_to_self, #woodwork, #maker, #plywood
Notes to Self: Working with Plywood
Published May 5, 2024 by Alex C-G
I’ve been working with plywood at xHain a lot recently, so thought I’d gather my thoughts here. I’m an absolute beginner, but have got a lot of help and assistance from the other folks at the space who have a better idea of what they’re doing. This post gathers their advice and my own observations.
Notes
- I like to push posts when they’re “ready enough” - that means links or images may still be missing, but the basics are there. Otherwise I may shift focus and not get anything out at all. If you see something missing and you need it, ping me on Mastodon and I’ll see if I can get back to it.
My Use Case
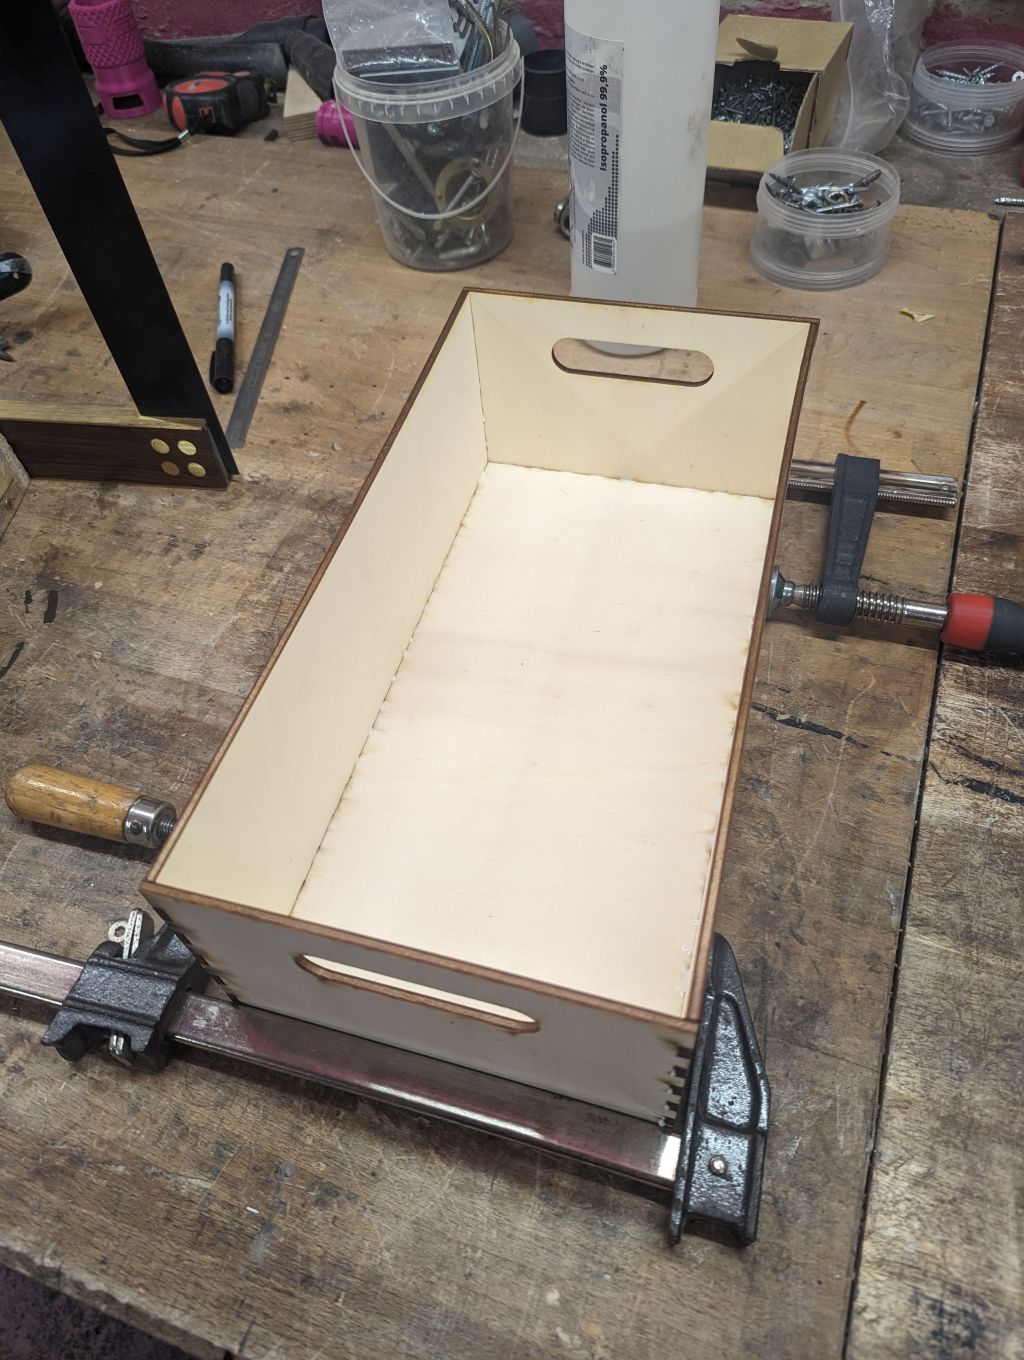
I’ve been really into cooking lately, and I’m building a plywood box to hold all my spice jars.

I initially made a very basic box (let’s call it v1), but I made some design mis-steps in my impatience (namely just lasering it and gluing it together without thinking about sanding, etching, staining, varnishing, or testing how to attach a lid),
This post mostly covers v2, in which I am either doing those other steps, or plan to. There will be some lessons from v1 thrown in too, since they follow the same architecture. I won’t go too much into what I’m etching, since:
- This is a personal project, and your mileage will obviously vary
- It’s using some assets that may not be covered under fair use by sharing on a blog. Since it’s just my own personal use, I’m fine with using them, but not sharing them.
Tools and materials
Materials
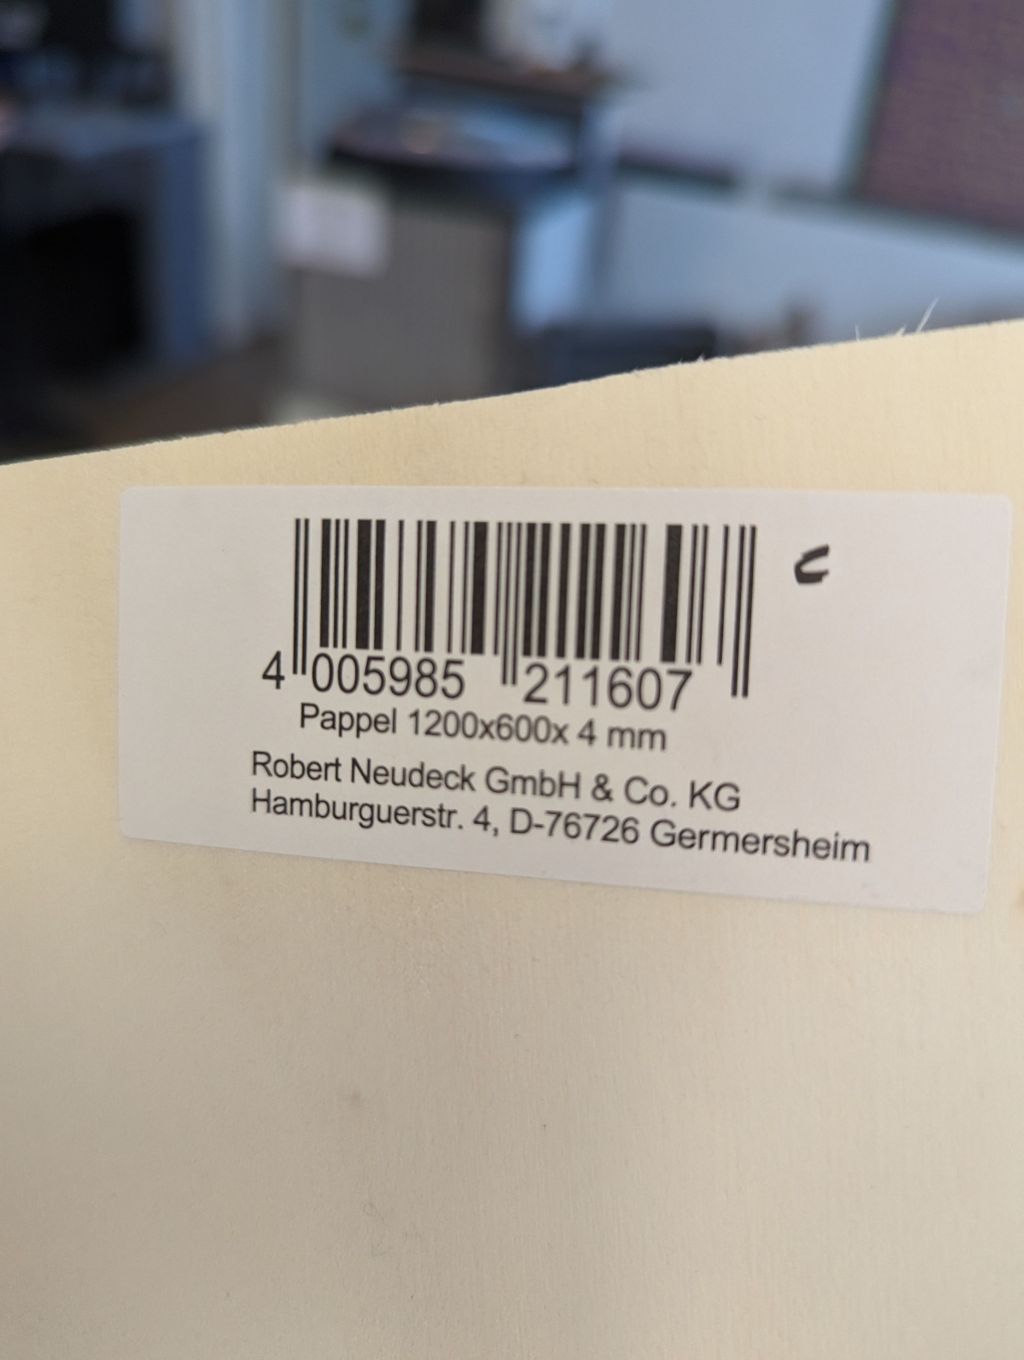
- 4mm plywood (Birch or Poplar)
- Wood stain
- Wood varnish
Tools
- Measuring:
- Vernier calipers (digital in my case)
- Foldable meter stick
- Marking:
- Carpenter’s pencil
- Square
- Long ruler
- Cutting: Circular saw or band saw
- Sanding:
- Sandpaper
- Tack cloth
- Designing:
- Laser cutting:
- Staining and varnishing:
- Paintbrushes, cloths, tupperware, paper towels
General Tips
- Measure twice, cut once.
- Safety first! Just because you have ten fingers, that doesn’t mean nine are mere backups.
- Read the instructions (in my case, on xHain’s wiki but also Google Translating German instructions for stain, varnish, etc).
- Put things back where you find them. If something is stored in the cabinet marked “flammable”, it’s likely for good reason.
- There’s a time and a place for elegance. Spending five hours fiddling with your graphic editor to avoid 0.1mm of material wastage is not a worthwhile endeavor.
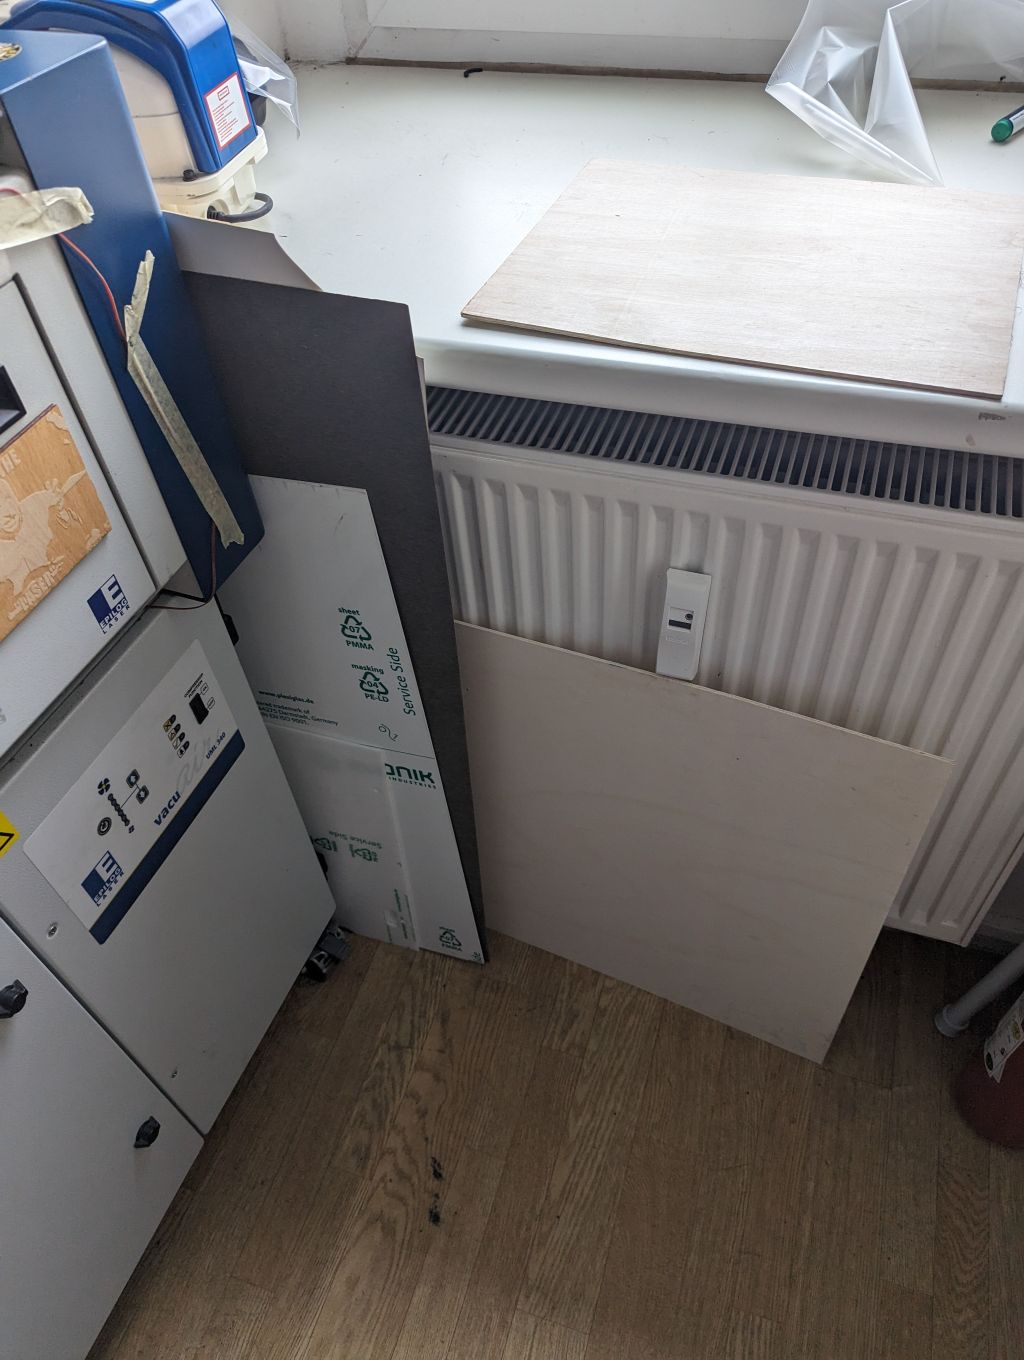
Buying Plywood
I first used a sheet of plywood I found in xHain’s machine room. This was definitely fit for purpose, and based on caliper readings was 4mm thick. The thickness isn’t really a big factor in my use case, since I’m using a parametric design that adjusts for thickness.
Due to storage, or perhaps just the way plywood is, it was a little warped, but we’ll get to fixing that later.
Since I ran out of usable plywood (The remainder didn’t have enough room to cut more pieces), I went to Bauhaus to pick up a pack of five A2 plywood sheets for about 15 EUR. Once again, I was a bit impatient, and didn’t check the grain (which thankfully is okay), or warpage (it’s a little warped, but fixable. I’m honestly not sure how common warping is when storing plywood, so maybe this is just par for the game).
Tips
- Shop around. Some places have much better prices than others.
- Aim to get more than you need. You’ll probably screw it up somehow (no judgement!). It’s best to have backup material, and if you don’t use it, you can donate it later.
- Check for a nice grain. I just eyeball it. I don’t know what I’m looking for. I guess knots in the wood depend on your use case.
- Check for warping. Hold the sheet side on, close one eye and look at each edge. Straight wood is good wood.
- Check for stains I guess? I didn’t see any.
- I doubt it’s important for my use case, but check the material. I used birch plywood for v1 and part of v2. And I bought poplar for the rest of v2. Likely not a big deal, since I can adjust the laser cutter, but I have yet to fuck around and find out.
Flattening Plywood
To mitigate (but not totally eliminate) the warping, I:
- Used a paintbrush to give each side of the plywood sheet a coating of water, letting it soak in. This makes it more flexible.
- Wiped it off (along the grain) after a few minutes. I used a paper towel, but would use a cloth next time since it can absorb more and is less messy than chucking away saturated wads of paper.
- Put the sheet on a sturdy flat surface.
- Put a heavy flat thing on top for 24 hours (in my case, it was a bigger piece of heavy wood, and my storage box on top of that)
The board ended up flatter than before, though still not perfect. To be honest, since my piece is relatively small and will be glued together anyway, the pieces should fall into the right shape anyway. But even so, I wanted to do a good job of it.
Cutting Plywood to Size
Since xHain’s laser cutter has a bed of 60cm by 30cm, I cut wood to size using the circular saw or band saw.
Making Cut Marks
- First I measured with a tape measure, then marked (with a carpenter’s pencil) where to cut.
- Using a square, I extended that line.
- I did the same the other side of the board, creating a second cut mark.
- I used a ruler to join the cut marks.
Cutting with Saw
I did several cuts over several days, using the band saw and table saw. Be sure to get a buddy to help you if you’re new to them (like I was!). Or just use a manual saw.
Even with my cut line, it wasn’t perfectly straight, but it was good enough since I would later be cutting shapes out of it using the laser cutter.
Sanding Plywood
I didn’t sand the wood in advance for v1, since plywood is already pretty smooth. But afer handling the box for a while, the slight roughness became more noticeable. Based on advice given in the xHain chatroom, for v2 I:
- Used 180 grit sandpaper to manually lightly sand with the grain of each sheet.
- (This is where I whould’ve used tack cloth if I had any to remove any sanding residue).
- Used 240 grit to lightly sand each sheet again.
- (Again, this is where I would’ve used tack cloth)
Back when I was fiddling with v1, I tried planing the surface, but that ended up a real mess, and was way rougher than when I started out.
Note: To be honest, I laser cut the plywood before sanding it for v2 - I don’t think this is such a big deal since my box consists of panels, which are pretty flat and sheet-like anyway.
Designing my Piece
For designing the piece I would cut, I used:
- An OpenSCAD library I downloaded from GitHub and then used to make a box that matched my design parameters. I exported it as SVG to import into Inkscape.
- Inkscape to arrange the pieces for cutting and vectorize bitmap images for etching.
I won’t go too much into the design process in this post.
Tips
- Be sure you’re dealing with paths. If you don’t convert something to a path, it may not show later in the laser cutter software. This happened to with some text.
- Use different color strokes for different operations - like making cut marks in black, and etch marks in red.
- Set stroke thickness to “hairline”. No idea if this makes a difference, but it’s what I was taught forever ago.
- It’s damn difficult to align pieces together and just have one common cut to separate them. For example, If I have piece A with a slot and piece B with a notch, I could align the notch into the slot so the edges are touching, but the laser cutter will still treat them as two edges, cutting the same line twice. Not a big deal for my level of precision, but not elegant. Based on advice, I moved the pieces 0.1mm apart. This means two cuts, with minimal material wastage.
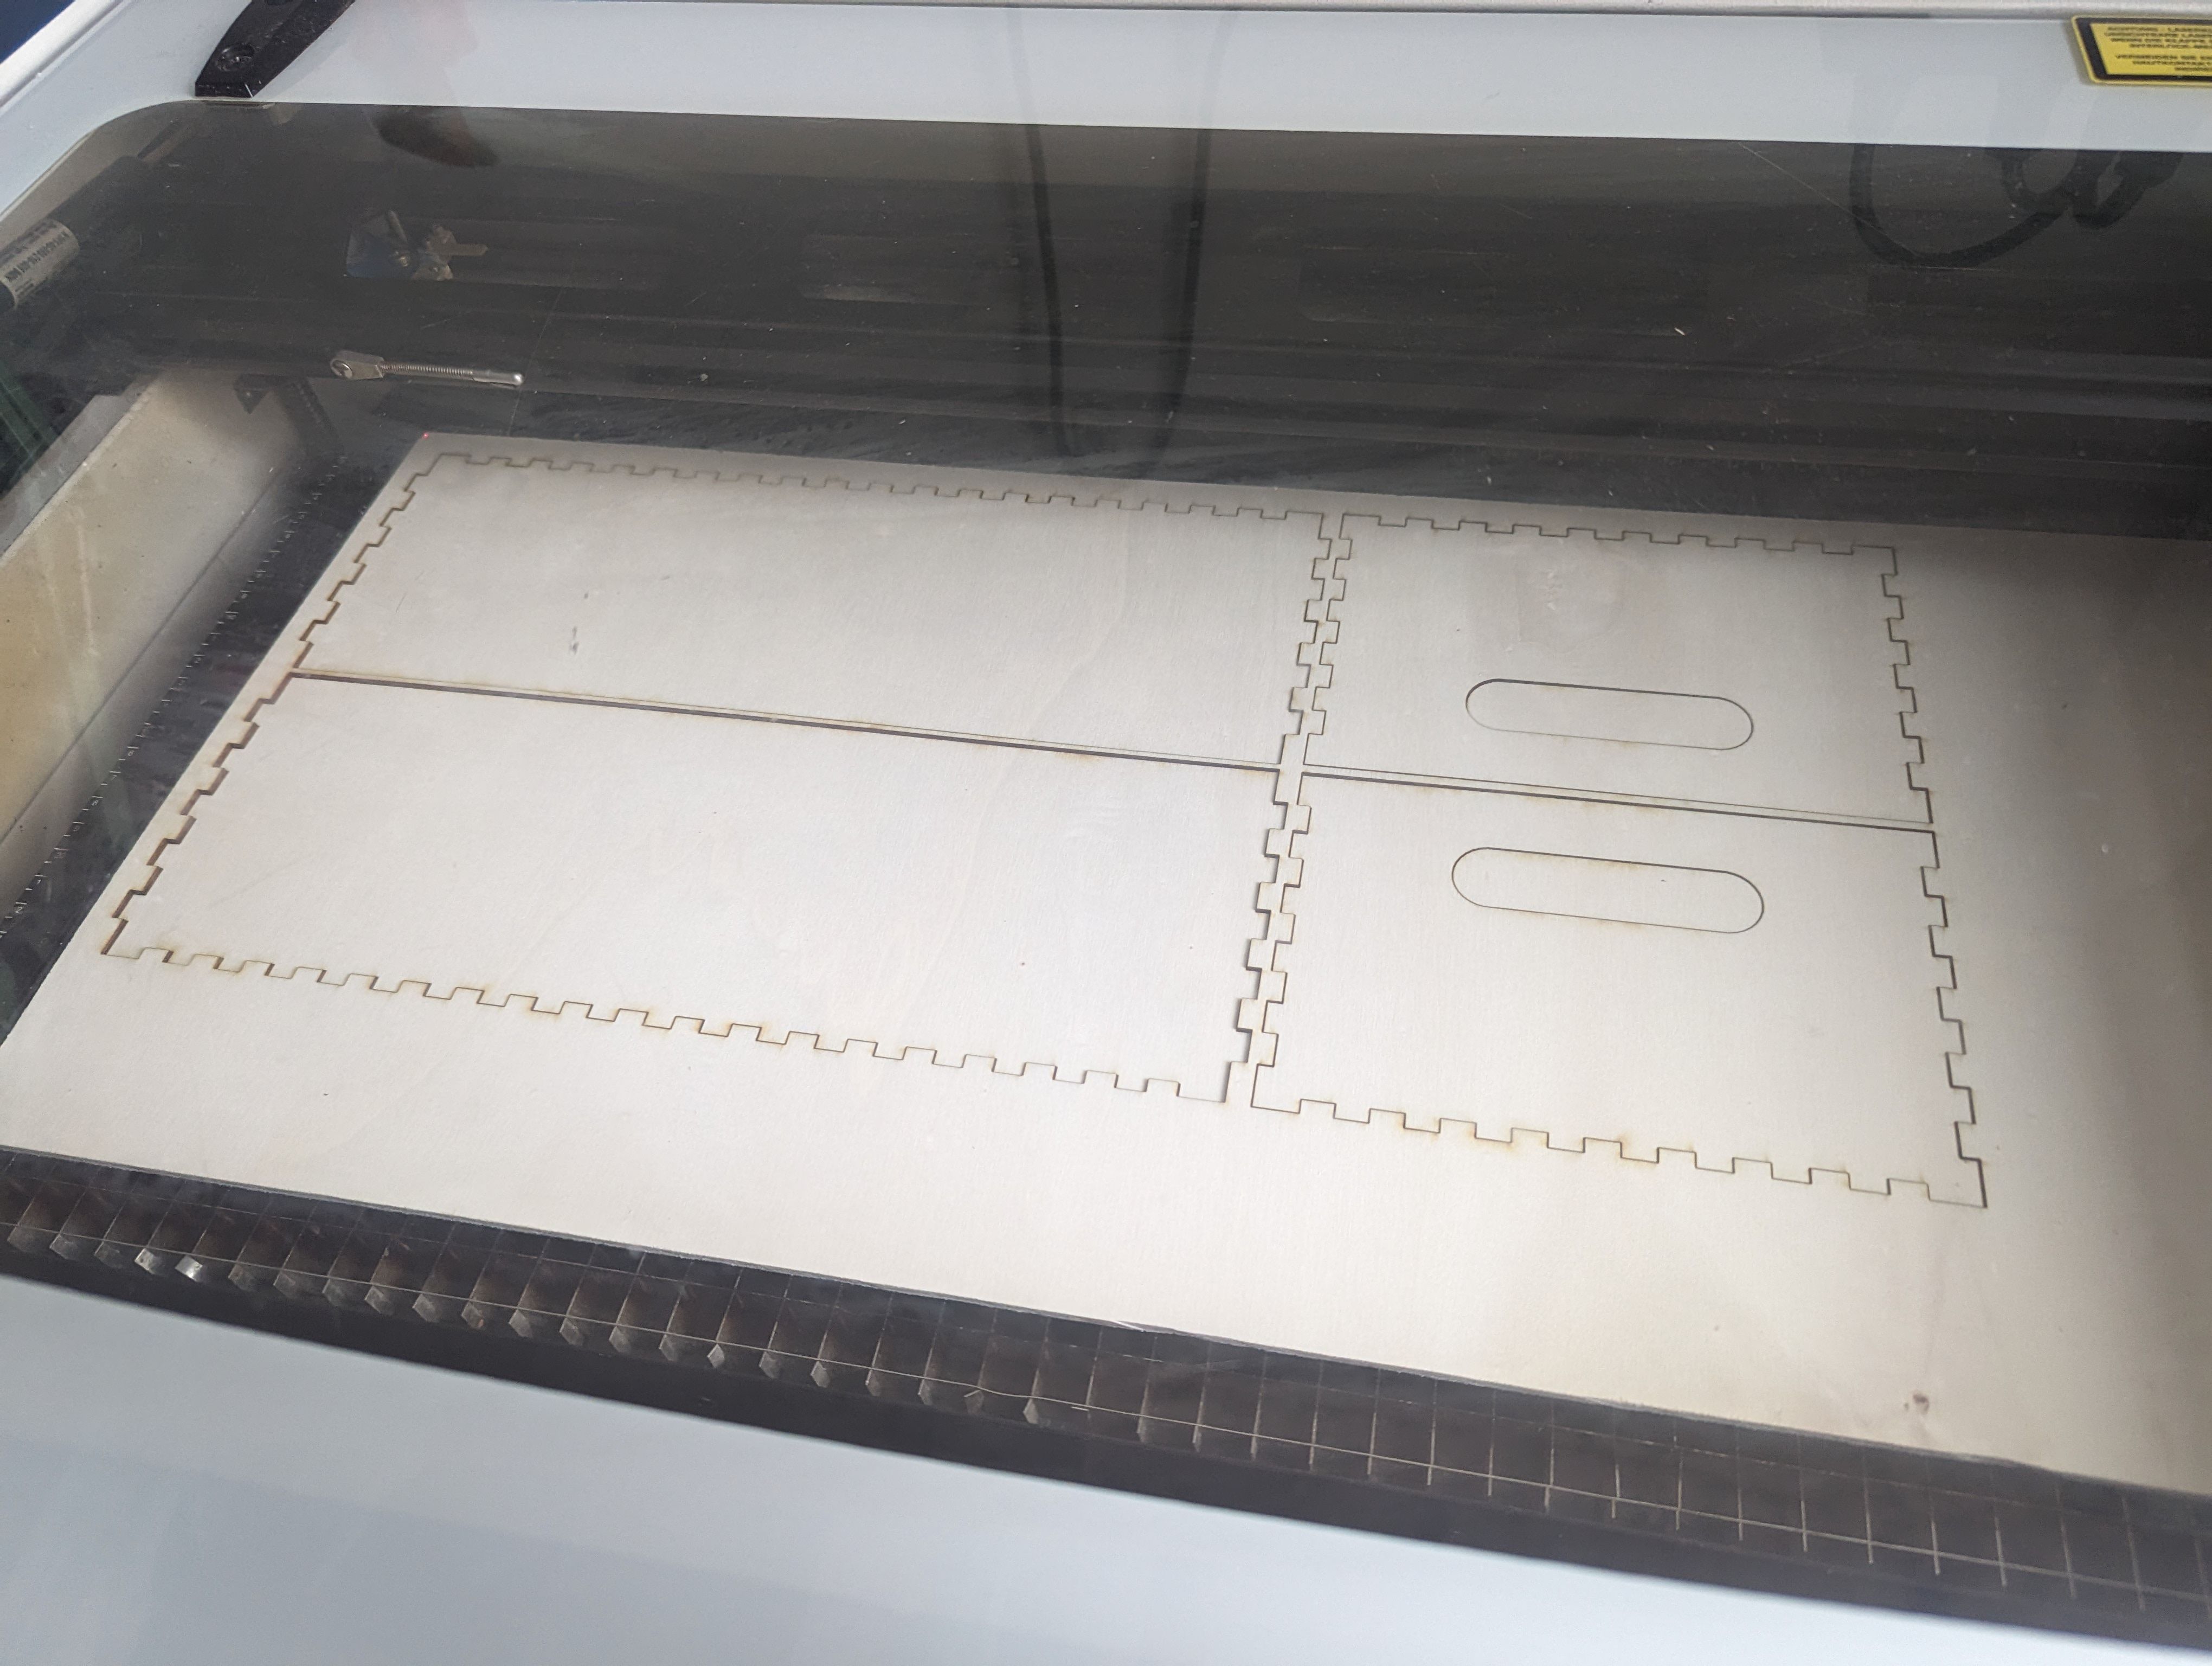
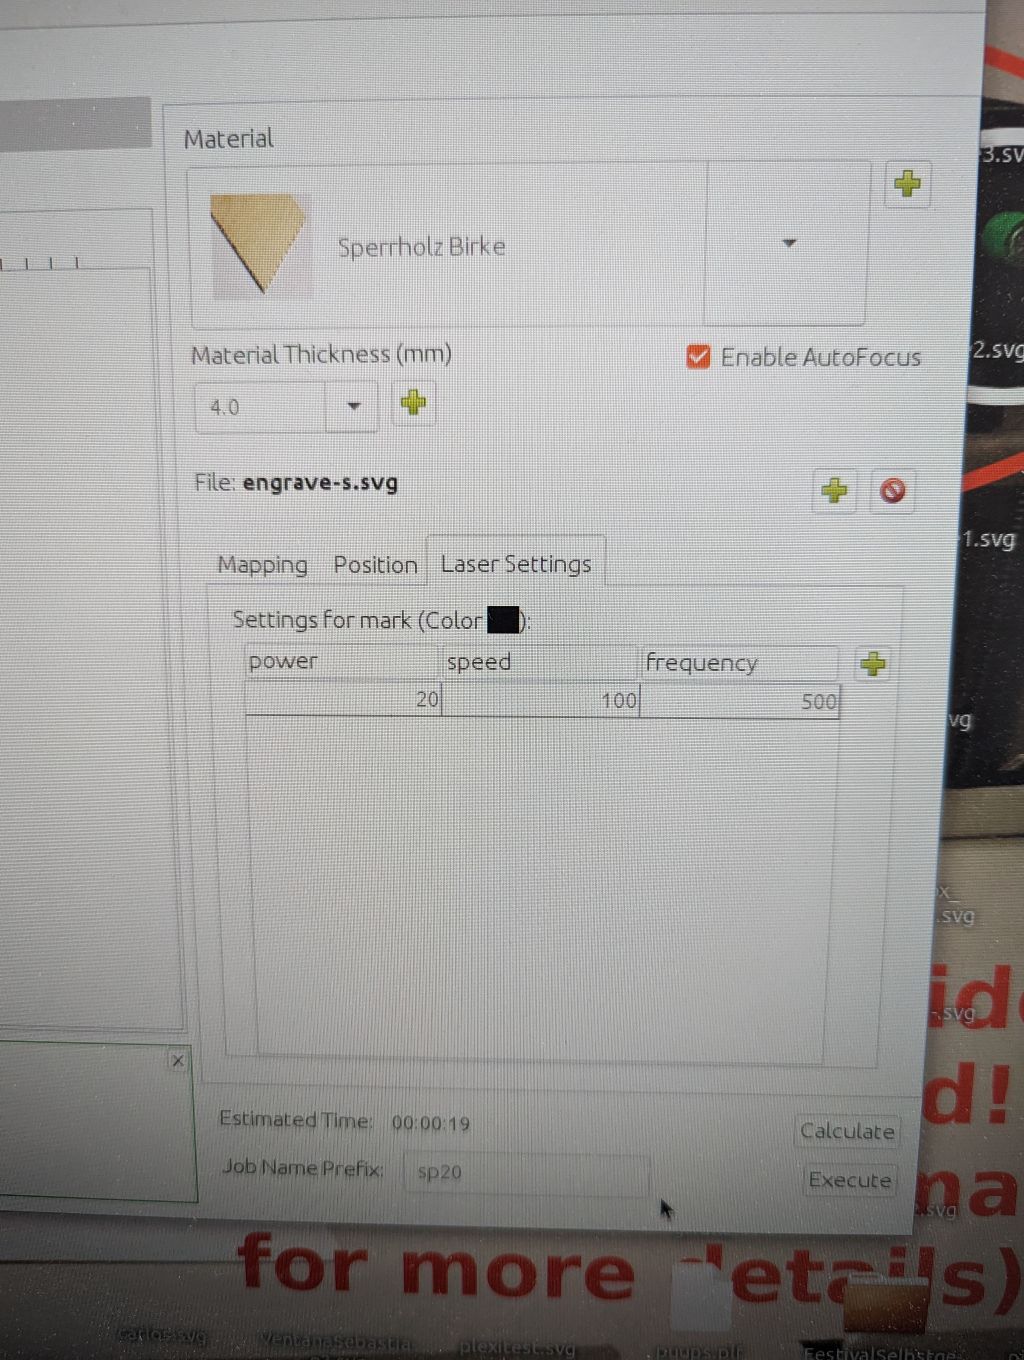
Laser Cutting Plywood
I used this Epilog laser cutter with the Visicut software.
Tips
- Make sure the laser cutter bed is aligned as best you can.
- Align the wood carefully with the bed’s edges.
- If you value the appearance of one side more than the other, put the nice side facing down. The top side is more liable to slight laser burns.
- Before you cut your piece for real, do a quick test run with the laser cutter open (which disables the laser itself). That way you can be sure your design will (a) fit on your wood properly, and (b) is not missing any strokes (this has happened to be once before).
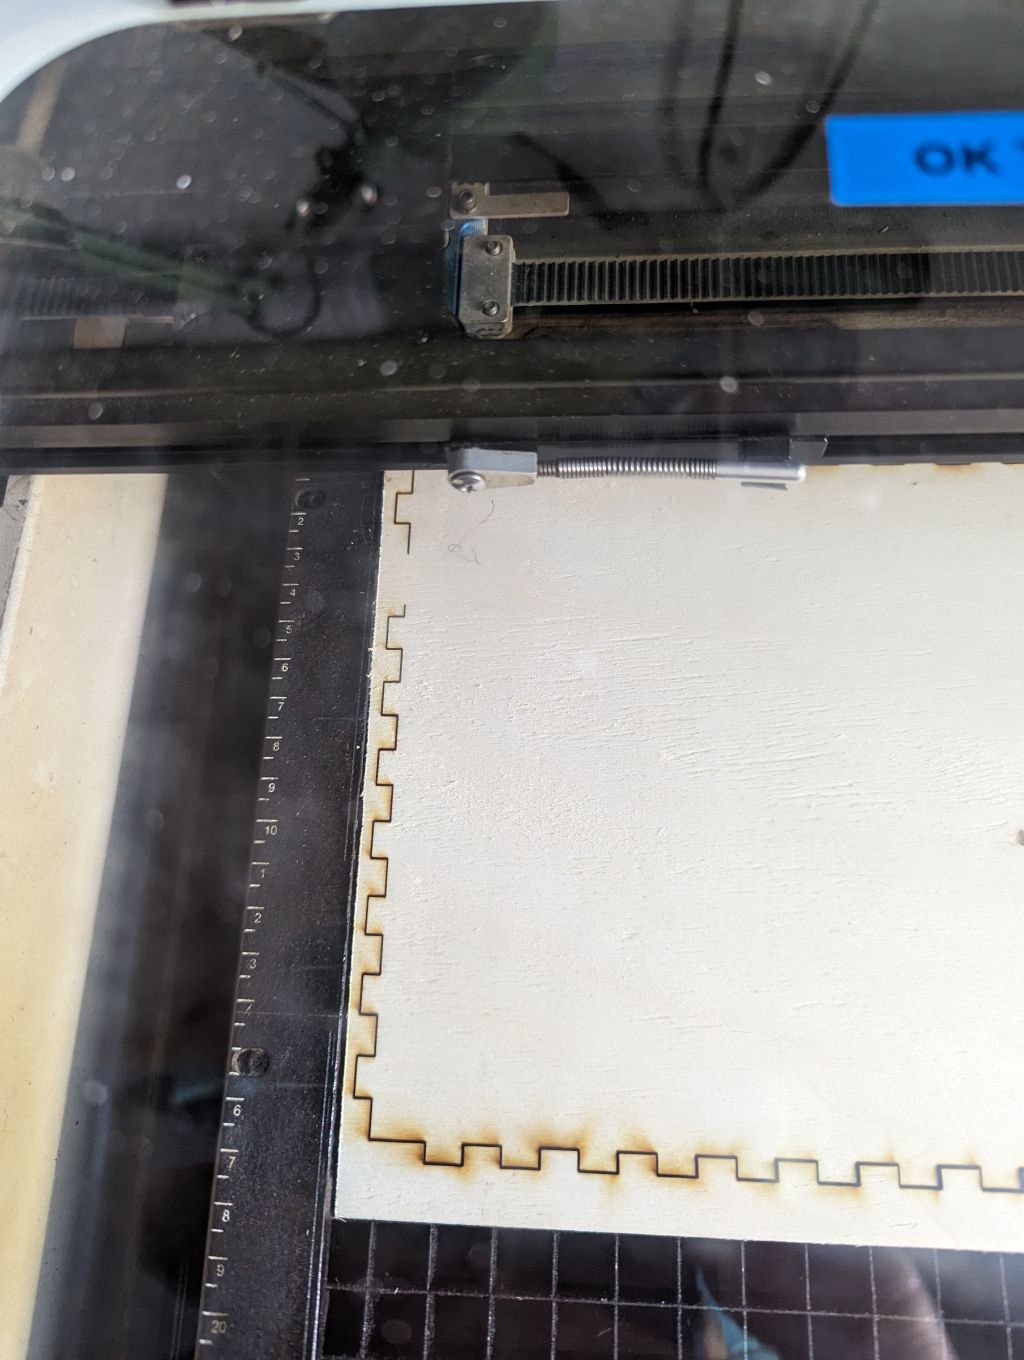
- Do some test cuts and etches first. For cutting, you want as thin a line as possible that still cuts through. For etching, your mileage may vary. My initial tests had very thin lines, but I wanted something chunkier. You can tweak things by juggling the power and speed settings (with me it’s trial and error). I ended up reducing speed to get a thicker etch line.
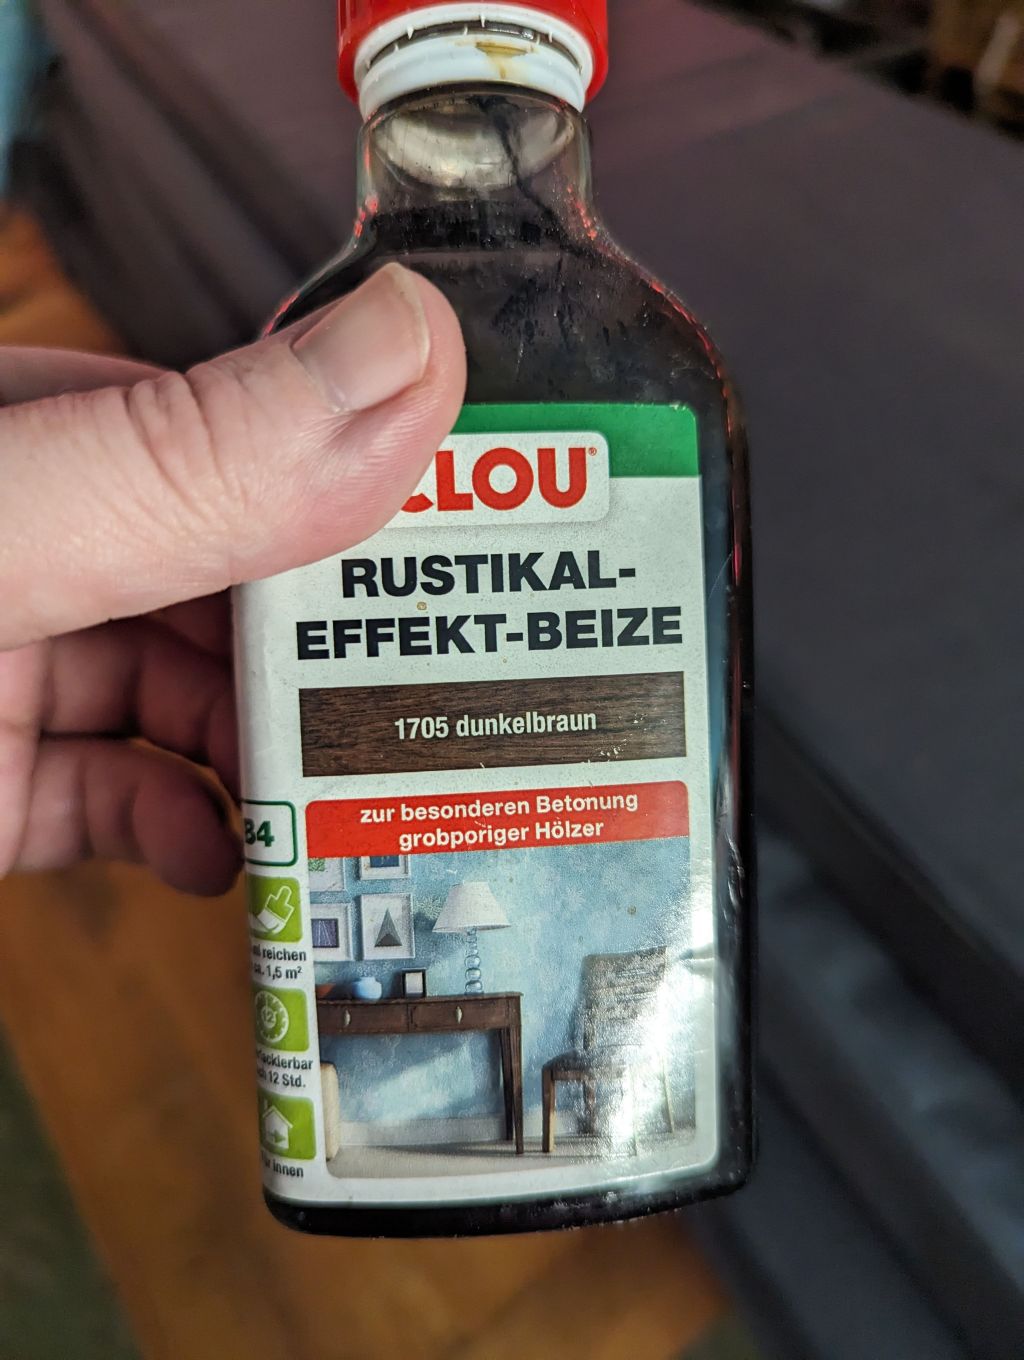
Staining Plywood
I watched many YouTube videos about staining plywood, but most of them covered oil-based stains. At xHain we only had a water-based stain to hand, and since I’m still new at staining, I didn’t want to splash out for any new stuff. So water-based it was! I used Clou Holzbeize:
Here’s how I did it, working with one side of my plywood at a time:
- Lay down paper towels below my piece.
- Tape over edges to stop stain leaking underneath to other side. I want both sides stained, but leakage makes coloring inconsistent in my experience. I used painter’s tape, but the water in the stain messed up it’s adhesive in some spots, so I might use other tape next time.
- Put on latex gloves.
- Turn on ventilator.
- Brush the surface lightly (along the grain) with water, using a paintbrush. You want to cover it thoroughly, and let the water absorb. This saturates the wood, giving it a consistent density, and preventing some areas absorbing more stain than others (if it’s already full of water, there’s nowhere for the stain to go).
- After a few minutes, wipe off the remaining water (with the grain).
- Shake up the stain bottle and pour a small amount into a container. I used some tupperware, which I won’t be using to eat from any time soon.
- With another brush, lightly paint the stain onto the board, going with the grain. I brushed until I had consistent coverage.
- Wait a couple of hours for it to dry enough. It won’t be fully set, but will give you an idea of the color.
- Stand the wood to dry vertically if you can to prevent stain leaking to the other side (I haven’t actually tried this, but I will for my next session). I guess doing it so the grain is vertically-aligned would make sense, but at that point I don’t think the stain is going anywhere.
- Once it’s dry, give a quick sand with 240-grit paper (once again, with the grain) and apply more coats as needed, sanding each time.
- Clean everything up, turn off ventilator.
Tips
- Don’t worry if it looks like crap after you first apply the stain. In my case it looked more yellow than I thought it would, and pretty blotchy. The color improved markedly overtime, and the blotchiness somewhat.
Varnishing Plywood
Varnishing makes the wood more resilient and adds a slight (in my case) gloss.
I used this AquaClou varnish, since we had it at xHain.
PICTURE
Someone previously used it for varnishing bird boxes I think. I’m still early on in this phase, but here’s what I got so far:
- Once again, sand your plywood briefly with 240 grit sandpaper.
- Follow the same basic steps for staining plywood, except without the water wash.
Tips
- Try to match the stain color with varnish color I guess? I just used whatever we had, but it looks okay.
Gluing Plywood
For v1, I used the wood glue we had at the space, applying a very quick dab to every other tab of each side of my box, focusing on one edge at a time, and attaching pieces as I went. Be careful to just dab to avoid too much mess while gluing, or residue later on. The glue sets transparent, so it’s not really visible in the finished product.
I haven’t glued v2 yet, but v1 method seems sound.
4#169 2018-2026, Alex Cureton-Griffiths